Your Home Heating System: A DIY Maintenance Checklist for Peak Performance
A straightforward DIY furnace maintenance checklist empowers you to keep your heating system running safely, efficiently, and reliably. This proactive approach helps lower energy bills and significantly reduces the risk of costly breakdowns. This guide will walk you through what routine furnace care entails, how each step contributes to preserving your heat exchanger and airflow, and the direct advantages: enhanced furnace efficiency, a longer system lifespan, and improved home safety. Many homeowners grapple with inconsistent heating, escalating utility costs, or concerns about carbon monoxide risks. This checklist tackles these issues head-on with clear, step-by-step instructions, essential safety precautions, and guidance on when to call in the pros. First, you'll master core DIY tasks like changing filters, testing your CO detector, cleaning the blower area, and checking your thermostat. Next, we'll cover recommended maintenance frequencies, common warning signs to watch for during your checks, and straightforward advice on which problems demand a certified technician. Finally, we'll outline when it's time to call for professional help, what a typical tune-up involves, how Direct Air LLC can support Oklahoma City homeowners, and best practices to keep your furnace humming along efficiently.
What Are the Most Important DIY Furnace Maintenance Tasks?
The most crucial DIY furnace maintenance tasks are those you can perform to ensure optimal airflow, safe combustion, and accurate temperature control by focusing on your furnace's key components: the filter, blower area, CO detector, and thermostat. These actions work by clearing obstructions to airflow, verifying that safety detection systems are operational, and ensuring control settings are calibrated for proper furnace cycling and efficient fuel burning. Completing these checks leads to greater indoor comfort, reduced energy consumption, and a lower risk of safety incidents like carbon monoxide exposure. The list below prioritizes the highest-impact tasks for a single maintenance session and includes essential tools and basic safety considerations before you begin.
Before diving into the table and detailed steps, make sure you have appropriate personal protective equipment (gloves, eye protection) and a non-contact voltage tester or visual confirmation to ensure power is off. These preparations minimize risk and allow for safer component inspection. The following sections will guide you through safe preparation, filter replacement, CO detector testing, blower area cleaning, and thermostat setting verification.
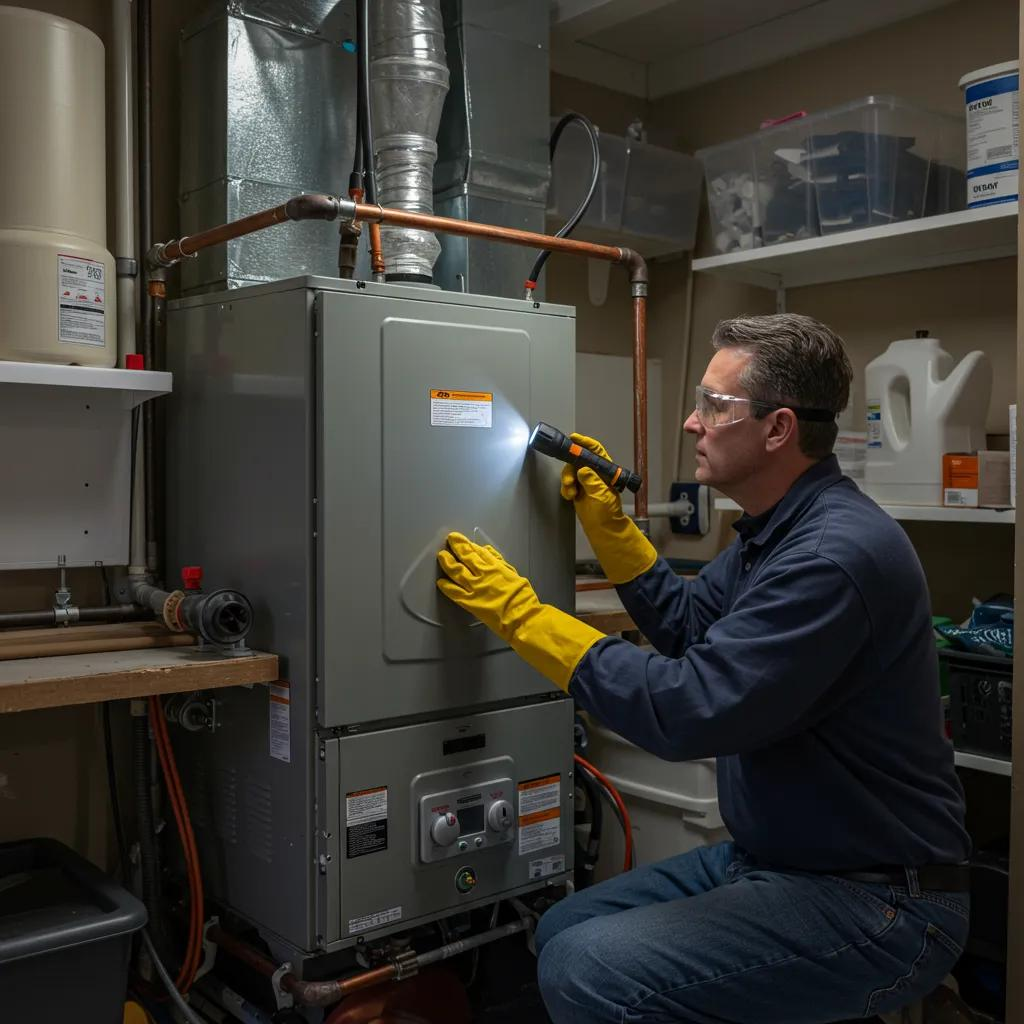
How to Safely Prepare Your Furnace for Maintenance
Properly preparing your furnace before any maintenance means cutting off power, ensuring adequate ventilation, and wearing simple personal protective equipment (PPE). This ensures that even minor checks are performed safely and effectively. First, turn off your furnace at the thermostat, and then at the circuit breaker to prevent accidental startup. Confirm that the fan and pilot light are not operating before you open any access panels. Second, ventilate the area and wear gloves and eye protection to minimize dust inhalation and contact with debris as you inspect panels and components. Finally, gather your basic tools — a flashlight, soft brush, vacuum with a crevice tool, and a screwdriver — so you can proceed efficiently. These steps lay the groundwork for safe furnace tune up and blower cleaning.
This safety sequence significantly reduces the chance of electrical shock or ignition during routine work, leading directly into the simple procedure for checking and replacing your furnace air filter.
How to Check and Replace Your Furnace Air Filter
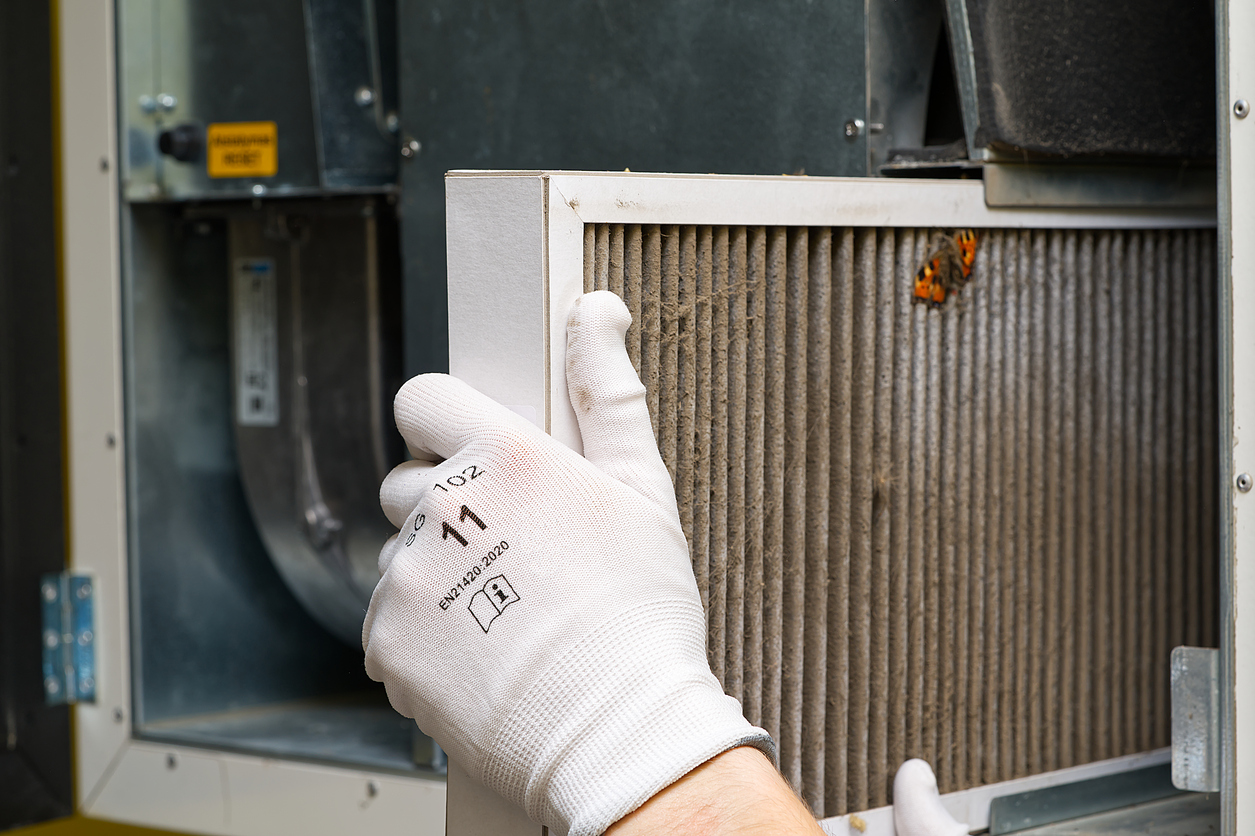
Replacing your air filter is a high-impact maintenance task that dramatically improves airflow and reduces strain on your blower motor by removing the particulate obstructions that drive up energy use. Locate the filter slot, carefully slide the old filter out, and hold it up to a light source for inspection. A visibly clogged filter should be replaced immediately. Install the new filter, ensuring it's oriented correctly with airflow arrows pointing toward the furnace. Choose a filter suitable for your home: disposable fiberglass or pleated filters with MERV ratings that align with your indoor air quality needs. Remember, a higher MERV rating offers better filtration but may require more frequent checks. Replacing the filter typically takes only a few minutes and directly reduces your blower's workload and energy consumption, so make this step your first priority during routine maintenance.
Consistent filter care is foundational. Once your filters are in good shape, you can move on to verifying your carbon monoxide detection and safety devices, which are critical for protecting occupants from combustion faults.
How to Test and Maintain Your Carbon Monoxide Detector
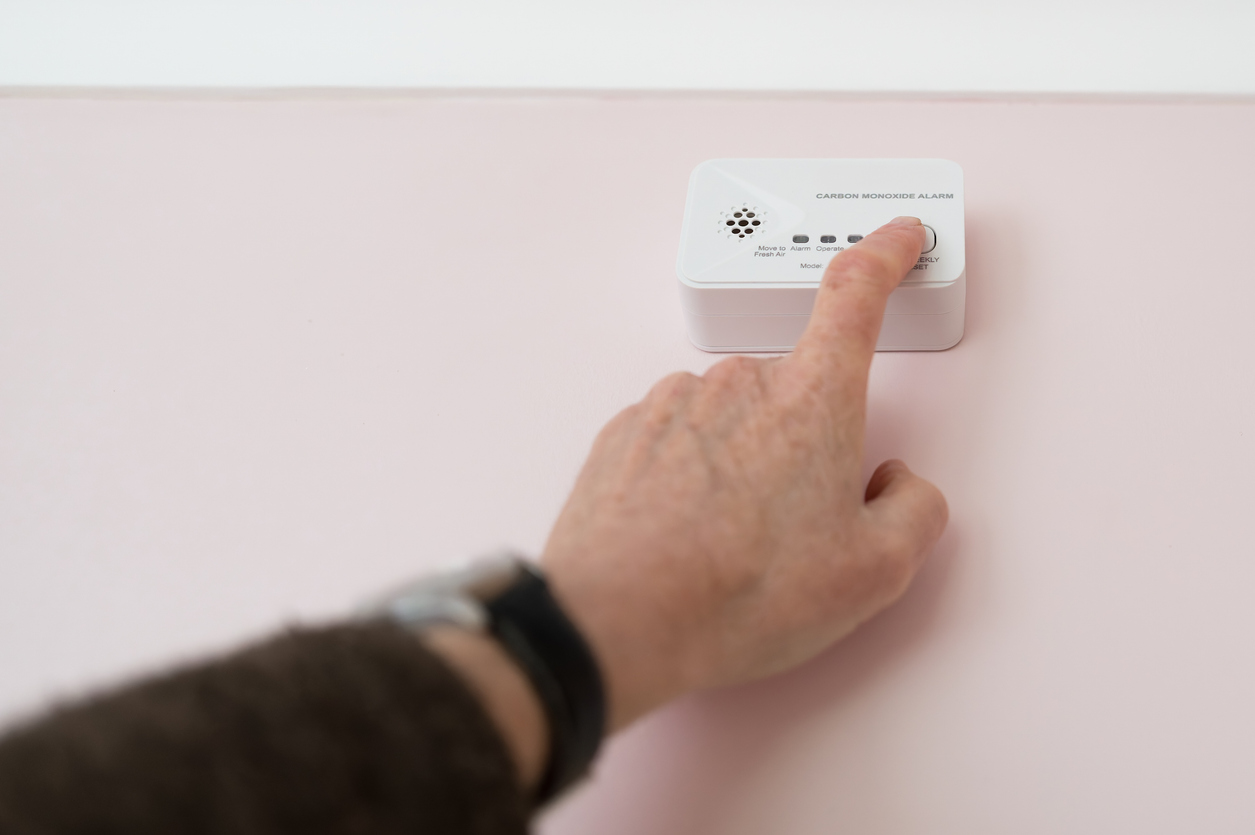
Testing your carbon monoxide detectors is vital for safeguarding occupants by ensuring the device will reliably alert you to invisible CO risks that can arise from combustion issues, such as incomplete burning or a cracked heat exchanger. Test your detectors monthly using the built-in test button and replace batteries at least annually, or as recommended by the manufacturer. If a detector shows end-of-life indicators, replace the unit promptly, following the expiry date printed on its housing. If a CO alarm sounds, evacuate your home immediately, call emergency services, and do not re-enter until the area is declared safe. These steps prioritize life safety above all else. Maintaining correctly functioning detectors complements your furnace checks and provides a critical last line of defense against combustion hazards.
After confirming your detectors are ready, the next step in routine care is to clean the blower and its surrounding area to maintain optimal airflow and prevent soot buildup.
How to Clean the Furnace Blower and Surrounding Area
Cleaning the blower area is essential for restoring proper airflow and reducing dust accumulation, which can compromise motor bearings and electrical contacts. This, in turn, decreases the likelihood of motor failure and efficiency loss. With the power confirmed off, open the blower access panel. Gently vacuum any visible dust from the blower housing and surrounding surfaces using a brush attachment, and remove debris from intake areas. Avoid spraying liquids or directly contacting motor windings. If you encounter heavy buildup, visible oiling needs, or broken belts, stop immediately and plan for professional service, as these symptoms indicate issues beyond basic DIY maintenance. Regularly clearing the blower area helps keep the motor cooler, prolongs component life, and improves overall system efficiency.
With debris cleared and the blower confirmed to be free to spin, your final basic checks will focus on the thermostat replacement to ensure accurate control of your heating cycles.
How to Inspect Your Thermostat Settings for Optimal Heating
Inspecting your thermostat settings ensures your furnace operates at the intended setpoints and follows energy-saving schedules, preventing the system from overworking or short-cycling, which reduces wear and tear and lowers utility bills. Verify that the thermostat is set to heating mode, check programmed schedules for sensible temperature setbacks, and replace thermostat batteries if the display is dim or erratic. Recalibrate or consult the manual if readings differ from a reliable room thermometer by more than a degree or two. For smart thermostats, confirm Wi-Fi connectivity and review any seasonal schedules or geofencing features that influence heating. Poor placement near drafts or direct sunlight can skew readings and cause unnecessary runtime. A properly configured thermostat completes the loop on efficient operation by ensuring the furnace runs only when needed and to the correct temperature.
If any step here reveals a problem beyond simple corrections — for example, a thermostat that won't boot or a blower that won't run after cleaning — consider contacting a professional for diagnostic testing and repair.
After completing these DIY checks, homeowners who prefer professional assistance or who discover concerning issues can reach out to Direct Air LLC for furnace maintenance and tune-ups. Direct Air LLC offers 24/7 emergency services, EPA-certified technicians, transparent pricing, and a 100 percent satisfaction guarantee for Oklahoma City homeowners.
How Often Should You Perform Furnace Maintenance at Home?
Performing furnace maintenance at appropriate intervals is key to preserving system efficiency and reducing the chance of unexpected failures. A predictable schedule balances frequency with impact for filters, detectors, and visual inspections. Monthly checks for filters help maintain airflow, quarterly visual inspections can catch developing problems early, and an annual comprehensive inspection or professional tune-up addresses combustion and mechanical wear. The frequency can vary depending on factors such as household size, pets, indoor air quality needs, and system age. Homes in high-dust environments or those with pets often require more frequent filter changes and spot checks. The table below summarizes recommended cadences and signs that might trigger extra checks, helping you establish a practical maintenance rhythm.
This schedule helps homeowners prioritize their tasks. The following subsections will break down filter schedules, CO detector testing cadence, and the value of regular visual inspections.
What Is the Recommended Filter Replacement Schedule?
Filter replacement frequency depends on the filter type and household conditions, and it directly influences airflow and energy consumption by preventing restriction of intake air. For typical disposable filters in an average home, inspect them monthly and replace them every 1–3 months. Higher-MERV pleated filters might last up to 3 months in low-dust environments, but they should still be checked monthly if you have pets, smokers, or have recently undergone renovations. Use visible inspection as your guide: if the filter surface is dark and light doesn't pass through, replace it immediately. Clogged filters force your furnace to run longer and reduce its efficiency. Sticking to a regular replacement schedule is a simple yet effective way to maintain furnace efficiency and prolong component life.
Adjusting your filter schedule to match seasonal use and occupancy helps maintain peak performance during the months with the highest demand.
When Should You Test Your Carbon Monoxide Detector?
Carbon monoxide detectors should be tested monthly, and their batteries replaced at least annually, to ensure they will alert occupants if combustion becomes unsafe, as CO is colorless and odorless. Additionally, replace detectors according to the manufacturer’s stated end-of-life date — typically 5–10 years — because sensor effectiveness naturally declines with age, and sensors stop responding reliably. If a detector fails to test, replace the batteries and retest immediately. Persistent failure requires replacing the unit, and any CO event should be treated as an emergency: evacuate and contact emergency services. Regular testing is absolutely essential because these detectors are the primary household safeguard against invisible combustion hazards.
Routine tests are quick and offer a significant safety payoff, complementing monthly filter checks and quarterly visual inspections.
How Regular Visual Inspections Prevent Furnace Problems
Visual inspections performed quarterly can catch rust, loose panels, soot buildup, and leaks early on, preventing small issues from escalating into major repairs or safety hazards. Look for signs such as rust on the heat exchanger or ducts, oil or water on the floor indicating leaks, frayed wiring at accessible junctions, and soot around the burner area. Documenting these observations can help technicians prioritize repairs during a professional visit. Early visual detection of soot or yellow flames indicates combustion problems that may require immediate professional attention to avoid CO risks. Regular inspections create a valuable maintenance history that improves diagnostics and reduces long-term repair costs.
Consistent visual checks tie directly into the diagnostic guidance below, which helps homeowners interpret warning signs during their DIY maintenance efforts.
What Are Common Furnace Issues You Can Identify During DIY Maintenance?
During your DIY maintenance sessions, you can identify common issues such as unusual noises, strange odors, changes in flame color, and visible corrosion. These signs often indicate underlying mechanical or combustion problems. Recognizing these signs and understanding their likely causes enables you to take immediate, safe actions — such as reducing system use, ventilating the area, or evacuating — and helps you determine whether to schedule professional repairs. Early identification minimizes downtime and prevents minor faults from escalating into heat exchanger damage or motor failure. The EAV-style triage table below helps you prioritize responses based on the symptom, its likely cause, and whether professional intervention is required.
After the table, we'll explore how to interpret noises and odors, diagnose flame color, and spot rust, leaks, or other visual damage.
This triage table is designed to help homeowners choose safe next steps and clearly indicates when a visit from a certified technician is necessary.
When Should You Call a Professional for Furnace Maintenance or Repair?
Call a professional when the issue involves combustion testing, gas handling, heat exchanger inspection, complex electrical diagnostics, or when safety alarms indicate immediate danger. Professionals possess specialized instruments and certifications to perform combustion analysis, measure gas pressure, test for carbon monoxide leaks, and inspect heat exchangers safely — tasks that carry significant risk if attempted by non-certified DIYers. Recognizing clear warning signs such as a gas smell, CO alarm activation, a yellow flame, or persistent mechanical noises should trigger an urgent professional response rather than continued DIY attempts. The list below outlines tasks that are beyond safe DIY scope and details the typical benefits of professional tune-ups that protect safety and system longevity.
How Can Direct Air LLC Help with Professional Furnace Maintenance in Oklahoma City?
Direct Air LLC is a trusted HVAC company serving Oklahoma City and surrounding areas, offering professional furnace maintenance and tune-ups performed by EPA-certified technicians. They provide 24/7 emergency availability, transparent pricing, and a 100 percent satisfaction guarantee. Their services encompass HVAC installation, repair, and maintenance across heating solutions, AC repair, and indoor air quality installations, positioning them to deliver comprehensive care that addresses combustion safety, airflow, controls, and IAQ considerations. A professional tune-up from Direct Air LLC focuses on restoring efficiency, verifying safety through combustion and CO checks, and providing a clear report of findings with recommended next steps. For homeowners seeking reliable professional escalation after DIY checks, Direct Air LLC offers locally available expertise and maintenance plan options to keep their systems running optimally.

Financing
.png)